Home automation, monitoring and control requires a user interface that is easy to use. There are numerous commercial solutions for this.
If you have high requirements for data security and privacy, a self-hosted smart home solution is the way to go. I tried a few open-source solutions and ended up happy with “Home Assistant”. In this post I want to explain how to get a minimal instance of Home Assistant, MQTT, Certbot and Nginx Proxy up and running with Docker Compose.
Installation docker-compose
Using docker-compose, Docker containers can be orchestrated with little effort. I use Debian as the operating system for my server. The instructions at this link describe the necessary installation steps.
docker-compose
The docker-compose.yml file looks as follows. It contains three services.
version: '3.5'
services:
  homeassistant:
    container_name: homeassistant
    restart: unless-stopped
    image: ghcr.io/home-assistant/home-assistant:stable
    network_mode: host
    privileged: true
    environment:
      - TZ=Europe/Berlin
    volumes:
      - ./homeassistant_config:/config
      - /etc/localtime:/etc/localtime:ro
    depends_on:
      - mosquitto
  mosquitto:
    container_name: mosquitto
    image: eclipse-mosquitto
    network_mode: host
    volumes:
      - ./mosquitto_conf:/mosquitto/config
      - ./mosquitto_data:/mosquitto/data
      - ./mosquitto_log:/mosquitto/log
  frontend:
    restart: unless-stopped
    image: staticfloat/nginx-certbot
    ports:
      - 80:80/tcp
      - 443:443/tcp
    environment:
      CERTBOT_EMAIL: owner@company.com
    volumes:
      - ./nginx_conf:/etc/nginx/user.conf.d:ro
      - letsencrypt:/etc/letsencrypt
volumes:
  letsencrypt:
Service: Home Assistant
This is the actual Home Assistant service. This service alone with its configuration is sufficient to get a running instance. The service can be accessed in the web browser on port 8123.
Service: Mosquitto
Mosquitto is especially needed if you want to use an MQTT instance to transmit IOT data to Home Assistant. Of course, any instance can be used as well. In my case, I want to have everything on one host.
Service: nginx-certbot
Home Assistant is by default operated without TLS on the insecure port 8123. For encrypted transmission, a web server with TLS encryption enabled is required. I found this image which downloads the latest version of Nginx and Certbot during installation.
Configuration
The container can be started using “docker-compose up”. After or during the first startup, a few changes must be made to the newly created configuration files.
Home Assistant
Home Assistant automatically creates a configuration file in the docker-compose folder during the first operation. In this file you only need to add the part for “http” integration.
# Loads default set of integrations. Do not remove.
default_config:

# Load frontend themes from the themes folder
frontend:
  themes: !include_dir_merge_named themes

# Text to speech
tts:
  - platform: google_translate

automation: !include automations.yaml
script: !include scripts.yaml
scene: !include scenes.yaml

http:
  use_x_forwarded_for: true
  trusted_proxies:
    - 127.0.0.1
  ip_ban_enabled: true
  login_attempts_threshold: 5
This allows the nginx proxy on application side. It might be necessary to enter a different IP address. Docker has its own IP address space internally that you can use here. The correct address can be found in logs.
Mosquitto
After the first operation of Mosquitto, a configuration file is also created here. This file must be modified further. The following command creates a valid password file. This command must be executed while the program is running.
docker-compose exec mosquitto mosquitto_passwd -c /mosquitto/config/mosquitto.passwd mosquittoNow the Mosquitto configuration can be updated with this file. The result looks like this.
persistence true
persistence_location /mosquitto/data/
log_dest file /mosquitto/log/mosquitto.log
listener 1883
## Authentication ##
allow_anonymous false
password_file /mosquitto/config/mosquitto.passwd
This prevents anonymous connection with Mosquitto.
Nginx-Certbot
In nginx a new file has to be created. The following nginx.conf can be created in the nginx_conf folder.
map $http_upgrade $connection_upgrade {
    default upgrade;
    ''      close;
}
server {
    listen		80;
    listen              443 ssl;
    server_name         example.com;
    ssl_certificate     /etc/letsencrypt/live/example.com/fullchain.pem;
    ssl_certificate_key /etc/letsencrypt/live/example.com/privkey.pem;
    if ($scheme = http) {
        return 301 https://$server_name$request_uri;
    }
    proxy_redirect off;
    location / {
        proxy_set_header        Host $host:$server_port;
        proxy_set_header        X-Real-IP $remote_addr;
        proxy_set_header        X-Forwarded-For $proxy_add_x_forwarded_for;
        proxy_set_header        X-Forwarded-Proto $scheme;
        proxy_pass http://127.0.0.1:8123/;
	proxy_set_header Upgrade $http_upgrade;
        proxy_set_header Connection $connection_upgrade;
    }
}
The marked digits must be modified if necessary. Instead of the local IP address, you can also simply specify the public IP address of the server.
Result
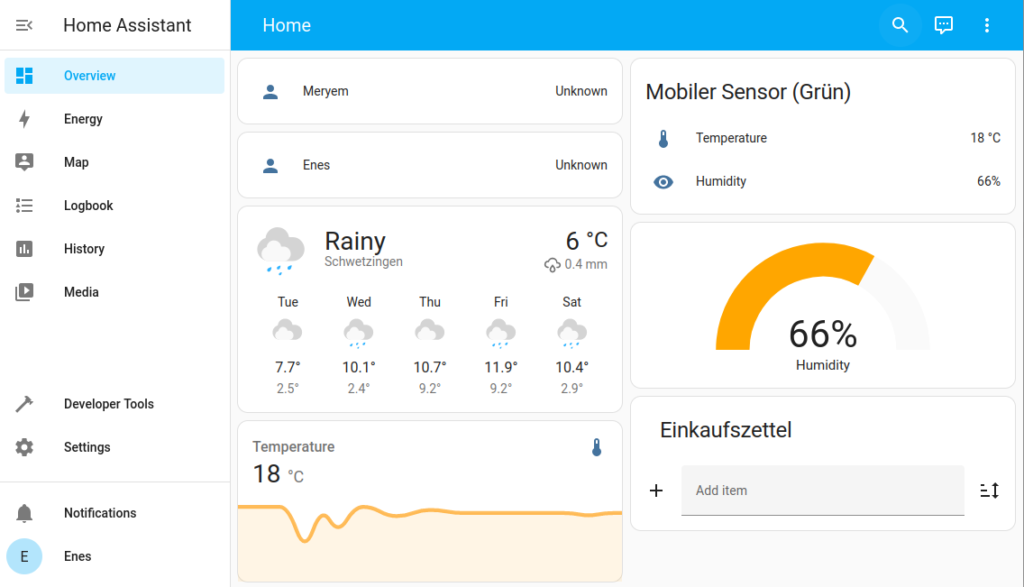
When you first open Home Assistant, you are guided through the user account setup process and subsequently have an instance that you can use for home automation, monitoring and control.
There is no on the possibilities you have with this solution. I plan to map all my energy consumption and production (solar panels) in the dashboard. I also want to include the lighting control of my living room in the dashboard. For fun, I also want to install an indoor surveillance camera whose video output I can view in the Smart Home Dashboard.